To generate visual stimuli, we are going to rely on the Pygame module. You can check if it is installed on your system by typing python on a command line and, at the >>> prompt, importpygame. If all is well, you should get the following message:
>>> importpygamepygame 2.0.1 (SDL 2.0.14, Python 3.8.5)Hello from the pygame community. https://www.pygame.org/contribute.html
Warning
If, instead, you obtain a message ending in ModuleNotFoundError:Nomodulenamed'pygame', one reason could be that you forgot to activate the virtual environment where you installed expyriment. Try condaactivateexpyriment or pyenvactivateexpyriment (use condaenvlist or pyenvvirtualenvs to list all available environments)
If this does not work, you can install pygame with pipinstallpygame.
Here is a Python script that opens a window and displays a square:
""" Display a square. See https://sites.cs.ucsb.edu/~pconrad/cs5nm/topics/pygame/drawing/ """importpygame# Colors are triplets containint RGB values# (see <https://www.rapidtables.com/web/color/RGB_Color.html>BLACK=(0,0,0)WHITE=(255,255,255)GRAY=(127,127,127)RED=(255,0,0)GREEN=(0,255,0)BLUE=(0,0,255)# Parameters of the Graphics WindowW,H=500,500# Size of the graphic window# Note that (0,0) is at the *upper* left hand corner of the screen.center_x=W//2center_y=H//2pygame.init()# Create the Graphic Window (designated by a variable `screen`)screen=pygame.display.set_mode((W,H),pygame.DOUBLEBUF)pygame.display.set_caption('square')screen.fill(WHITE)# fill the window with white# Draw a rectangle at the center of the window (in the backbuffer)width,height=200,200# dimensions of the rectangle in pixelsleft_x=center_x-width//2# x coordinates of topleft cornertop_y=center_y-height//2# y coordinate of topleft cornerpygame.draw.rect(screen,BLUE,(left_x,top_y,width,height))pygame.display.flip()# display the backbuffer on the screen# Note: this function is synonymous with `pygame.display.update()`# Save the image into a filepygame.image.save(screen,"square-blue.png")# Wait until the window is closedquit_button_pressed=Falsewhilenotquit_button_pressed:pygame.time.wait(10)foreventinpygame.event.get():ifevent.type==pygame.QUIT:quit_button_pressed=Truepygame.quit()
Exercise (*): make a copy of the script and modify the copy to
change the color of the rectangle to RED
change the size of the rectangle to 100 x 300
comment the line pygame.display.flip() and run the script. You should realize that merely drawing something to the display surface (screen) doesn’t cause it to appear on the screen – you need to call pygame.display.flip() to move the surface from general memory to video memory. This will be useful when you want to make an animation, that is, draw a sequences of images.
Exercise (*): Note that the circles above are filled with the color (actually, they are disks). Browse Pygame online documentation to find how to color the circumference of the circle and keep its inner part white.
Created by Italian psychologist Gaetano Kanizsa in 1955, the Kanizsa Triangle is a classic example of illusory contours. In the image below, a white equilateral triangle can be clearly perceived even though there are no explicit lines or enclosed spaces to indicate such a triangle. (To find out more about this illusion, perform a Google search with the keywords illusory contours.)
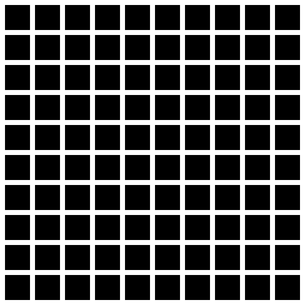
Play with the parameters ‘size of the squares’ and ‘space between the
squares’ to see how they affect the illusion.
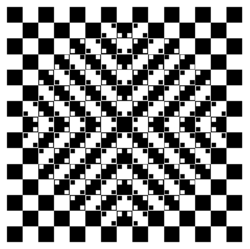
Read https://stackabuse.com/command-line-arguments-in-python/ to learn how to read arguments on the command line use the sys.argv[] list from the sys module. Create a version of the grid script that can get the number of columns, rows, the size of sides of squares, and the size of the space between squares. Play with those parameters to see if you can make the illusion come and go. (see grid-args.py)
Remark: there exists two powerful modules to help parse arguments on the command line: argparse or docopt
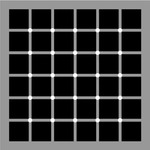
McAnany-Levine extinction illusion (see McAnany, J. J. and Levine, M. W. (2004) The blanking phenomenon: a novel form of visual disappearance. Vision Research, 44, 993-1001.)
Exercise: Program the McAnany-Levine extinction stimulus, that is, a grid of black squares with white circles at the intersection.
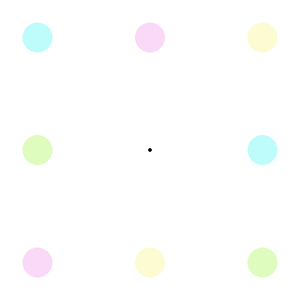
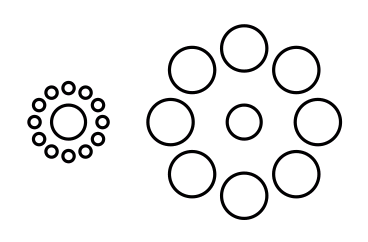
Exercise (**): Using circle.py as a starting point, write a program to display a static stimulus (one central circle surrounded by a number of circles).
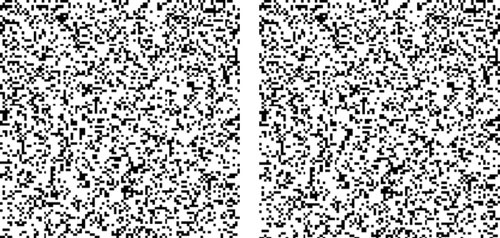
A random dot stereogram is a pair of images of random dots which,
when viewed with the eyes focused on a point in front of or behind the
images, produces a sensation of depth To see how they can be generated, read the wikipedia entry on
random dot stereograms, to understand the phenomenon in details, read the one about Stereopsis.
Exercise (***) Write a script that generates random-dot stereograms (warning: this requires a bit of knowledge of Numpy to represent the images as 2d arrays, and of slicing)
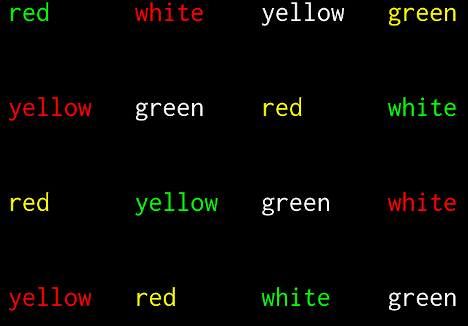
In the Stroop Task, participants are presented with a cards on which words are written in various colors. The task is to name as quickly as possible the colors of the printed words.
It is difficult to name the color of a color word if they do not match. This phenomenon, known as the Stroop Effect, demonstrates the automaticity of reading. Write a python script to create 4x4 cards for the task, as image files, avoiding repetitions of colors in neighboring cells.
You will need to read about how to generate images containing text, for example, in the tutorial How to display text with
pygame
Animated movies are just a succession of still pictures. If the rate of presentation is fast enough, the brain creates an illusion of continuity.
With pygame, programming an animation will follow the following temporal logic:
#draw picture1 in the backbuffer#flip the backbuffer to screen#draw picture2 in the backbuffer#wait for some time#flip the backbuffer to screen#draw picture3 in the backbuffer#wait for some time#flip the backbuffer to screen...
We take advantage of the double buffering mode (set by the option DOUBLEBUF in the call to pygame.display.set_mode()) to draw the next image in memory while the current one is displayed on the screen. It is only when we call pygame.display.flip() that the image in memory is displayed, replacing the current one on the screen.
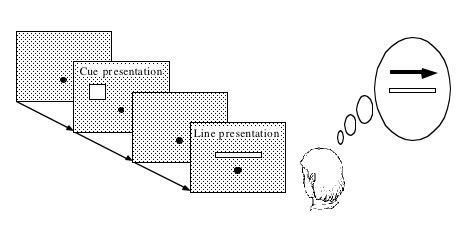
Illusory line motion (ILM) refers to a situation in which flashing a light at one end of a bar prior to the bar’s instantaneous presentation results in the percept of motion.
Exercise (*): Program the stimulus, that is, first draw a square, wait for a few milliseconds using the function pygame.time.wait(), then draw a rectangle overlapping with the initial square.
Do you feel that the moving square’s x position coincides with the flashing square or not? If you want to read about the Flash-lag illusion.
Exercise:
Create a movie of a square moving horizontally, back and forth. The
principle is simple: you just need to create a loop where you
display a square at coordinates x, y ,wait a few milliseconds, then clear
the screen, and increment or decrement the x coordinate by a fixed amount.
This strategy is explained in details at http://programarcadegames.com/index.php?lang=en&chapter=introduction_to_animation
(Optional exercise for advanced students: add blurring to the disks to make a stimulus similar to that of the wikipedia page Lilac Chaser. Then, for a solution, check out visual-illusions/lilac_chaser_blurred.py)
The module sound_synth.py provides several functions to load, create, and play sounds.
Exercise (**) Using functions from the sound_synth module, write a script that loads the file cymbal.wav and plays it 10 times, at a rhythm of one per second. (Warning: a basic knowledge of numpy arrays is necessary to concatenate the samples).
Exercise (**) Take the channel of a mono sound and create a stereo sound. Then dephase the two channels by various delays, and listen to the results.
Hints: load the sound file into a one dimensional numpy array, make a copy of the array and shift it, assemble the two arrays in a bidimensional array (matrix) and save it as a stereo file